mac电脑远程连接window软件microsoft-remote-desktop
星期一, 2022-05-02 | Author: Lee | mac | 没有评论 1,037 views

1.公司跳板机时windows,需要在mac装个远程连接工具,还时微软官方出的最稳定,记录下下载地址。microsoft-remote-desktop
2.官方下载及简介地址
https://docs.microsoft.com/en-us/windows-server/remote/remote-desktop-services/clients/windows
https://docs.microsoft.com/en-us/windows-server/remote/remote-desktop-services/clients/remote-desktop-mac
直接mac app store地址:https://apps.apple.com/app/microsoft-remote-desktop/id1295203466?mt=12
可惜的是国内无法下载不支持此地区,如果您有北美账号可以直接下载
3.使用Bate版本(国内可用)
当前版本:
Version 10.7.7 (1990)
Apr 27, 2022 at 05:46
82.68 MB
Java 开发常用的 Linux命令比较全
星期三, 2022-04-27 | Author: Lee | JAVA-and-J2EE, linux | 没有评论 999 views
Linux关机,重启
# 关机 shutdown -h now #或者 init 0 # 重启 shutdown -r now #或者 更常用 reboot |
查看系统,CPU信息
# 查看系统内核信息 uname -a # 查看系统内核版本 cat /proc/version # 查看当前用户环境变量 env cat /proc/cpuinfo # 查看有几个逻辑cpu, 包括cpu型号 cat /proc/cpuinfo | grep name | cut -f2 -d: | uniq -c # 查看有几颗cpu,每颗分别是几核 cat /proc/cpuinfo | grep physical | uniq -c # 查看当前CPU运行在32bit还是64bit模式下, 如果是运行在32bit下也不代表CPU不支持64bit getconf LONG_BIT # 结果大于0, 说明支持64bit计算. lm指long mode, 支持lm则是64bit cat /proc/cpuinfo | grep flags | grep ' lm ' | wc -l |
建立软连接
ln -s /usr/local/jdk1.8/ jdk |
rpm相关
# 查看是否通过rpm安装了该软件 rpm -qa | grep 软件名 |
mac下jdk多版本切换(jdk8与jdk11,jdk17)
星期五, 2022-04-22 | Author: Lee | JAVA-and-J2EE, mac | 没有评论 3,118 views
1.jdk8一直是公司应用的主力,还时要在开发机器上保留双版本(支持到2030,果然是长寿版本)
官方下载地址:https://www.oracle.com/java/technologies/downloads/#java8-mac
2.下载安装jdk11(支持到2026年)
官方下载地址:https://www.oracle.com/java/technologies/downloads/#java11-mac
最新的已经到jdk18了,jdk17(支持到2024年)
国内快速下载地址:清华镜像:https://mirrors.tuna.tsinghua.edu.cn/Adoptium/
华为镜像站:版本比较少 https://repo.huaweicloud.com/java/jdk/
更多地址可以参考:centos下jdk11及jdk8的环境变量配置
3.配置编辑.bash_profile文件 cd到用户目录
根据自己的路径调整 在 /Library/Java/JavaVirtualMachines 下
# 设置 jdk 8
JAVA_8_HOME=/Library/Java/JavaVirtualMachines/jdk1.8.0_331.jdk/Contents/Home
# 设置 jdk 11
JAVA_11_HOME=/Library/Java/JavaVirtualMachines/zulu-11.jdk/Contents/Home


#alias命令动态切换JDK版本
alias jdk8="export JAVA_HOME=$JAVA_8_HOME"
alias jdk11="export JAVA_HOME=$JAVA_11_HOME"

export JAVA_HOME="/usr/libexec/java_home"
#最后安装的版本,这样当自动更新时,始终指向最新版本
PATH=$PATH:$JAVA_HOME/bin
CLASSPATH=.:$JAVA_HOME/lib/dt.jar:$JAVA_HOME/lib/tools.jar
export JAVA_HOME PATH CLASSPATH
export PATH="/usr/bin:/bin:/usr/sbin:/sbin:/usr/local/bin:${JAVA_HOME}:${JAVA_HOME}/bin" |
3. source ~/.bash_profile 文件使其生效
通过输入jdk8便可以切换到jdk1.8
输入jdk11便可以切换到jdk11
日志中台不重不丢的实现架构及问题处理
星期三, 2022-04-20 | Author: Lee | JAVA-and-J2EE, 大数据 | 没有评论 1,235 views
可以参考实现自己公司的日志中台 来源:百度Geek说
导读:日志数据的生命周期包含日志采集、接入、传输、应用等各个环节。数据的稳定性对于公司报表建设、决策分析、转化策略效果都有至关重要的影响。全文旨在介绍百度日志中台当前的现状,公司内部应用推广情况。尤其在数据准确性的建设上,进行深入的探讨。数据产生到最终业务应用中各个环节的稳定性建设,包括:数据上报时效性优化、接入持久化的思考、数据流式计算过程中的不重不丢建设等。
一 简述
1.1 中台定位
日志中台是针对打点数据的一站式服务,实现打点数据的全生命周期管理,只需简单开发就能快捷完成日志数据采集、传输、管理以及查询分析等功能,适用于产品运营分析、研发性能分析、运维管理等业务场景,帮助APP端、服务端等客户探索数据、挖掘价值、预见未来。
1.2 接入情况
日志中台已覆盖了厂内大多数重点产品,其中包括:百度APP全打点、小程序、矩阵APP等,接入方面收益如下:
接入情况:几乎覆盖了厂内已有APP,小程序,创新孵化APP,以及厂外收购APP
服务规模:日志条数 几千亿 条/天,高峰QPS 几百万/秒,服务稳定性 99.9995 %
1.3 名词解释
客户端:指用户可以直接使用的软件系统,通常部署在用户手机或PC等终端设备上。例如百度APP、小程序等。
服务端:用于响应客户端发起的网络请求的服务,通常部署在云服务器上。
日志中台:此处特指端日志中台,包括端日志全生命周期的能力建设。包括打点SDK / 打点server/ 日志管理平台等核心组件。
打点SDK:负责打点日志的采集、封装、上报等功能。根据不同的日志生产端,分为APP端SDK、H5端SDK,根据场景区分为通用点位SDK、性能SDK、小程序SDK等,用户根据需求可以集成不同的SDK。
打点server:日志接收服务端,是日志中台服务端最核心的模块。
特征/模型服务:日志中台将需要进行策略模型计算的点位信息实时转发给下游<策略推荐中台>。特征/模型服务是<策略推荐中台>的入口模块。
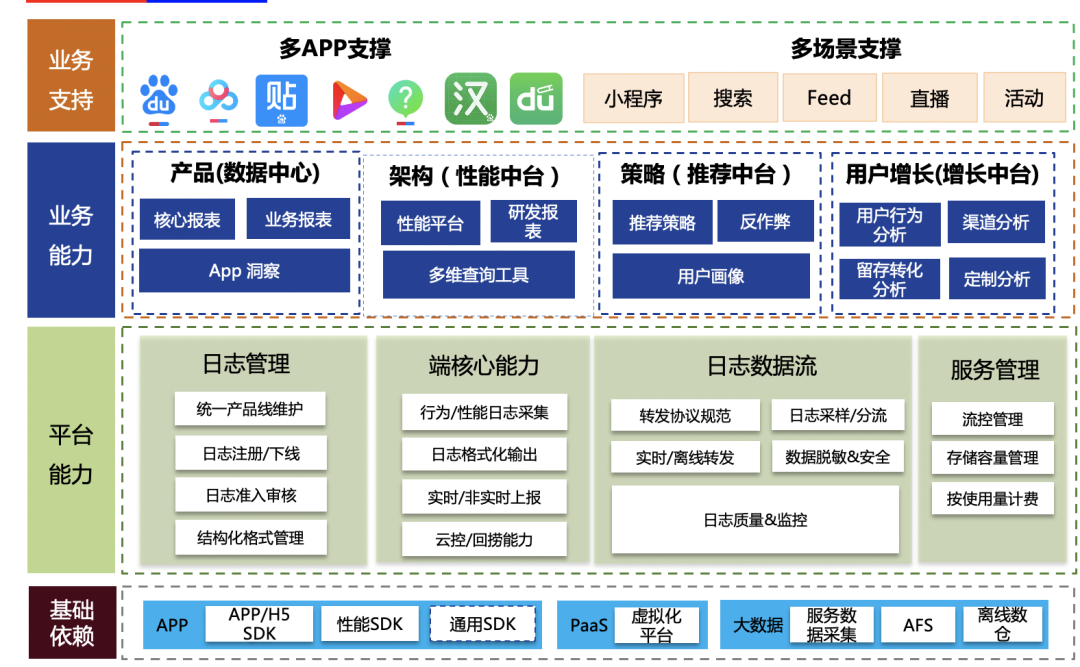
1.4 服务全景图
日志服务主要包括基础层、管理平台、业务数据应用、产品支撑几个层面。围绕着各个层级,在2021.6月,制定&发布了百度客户端日志上报规范。
基础层:支持了APP-SDK、JS-SDK,性能SDK、通用SDK,满足各类打点需求的快速接入场景。依托大数据基础服务,将打点数据分发至各个应用方。
平台层:管理平台支持数据元信息管理、维护,并控制打点生命全周期环节。在线层面支持数据的实时、离线转发、并依托合理的流量控制、监控保证服务稳定性在99.995%。
业务能力:日志打点数据输出至数据中心、性能平台、策略中台、增长中台等,有效助力产品决策分析、端质量监控、策略增长等领域。
业务支持:覆盖重点APP、新孵化矩阵APP,横向通用组件方面。
二、日志中台核心目标
如前文介绍,日志中台承载着百度内所有APP日志打点、站在数据生产的最前沿,在保证功能覆盖全、接入快速&灵活的基础上,面临的最重要核心挑战是数据的准确性。整个数据从产出、日志中台接入处理、下游应用,一切数据质量问题需要日志中台承载。而数据的准确性可以拆解为2部分:
不重:保证数据严格意义的不重复。需要防止系统层面的各种重试、架构异常恢复导致的数据重复问题;
不丢:保证数据严格意义的不丢失。需要防止系统层面的故障、代码层面bug等导致的数据丢失问题。
而做到系统层面的近乎100%的不重不丢,需要面临较多的难题。
2.1 日志中台架构
接入日志中台打点数据从端上生产至在线服务到最终(实时/离线)转发至下游,需要经过如下几个环节:
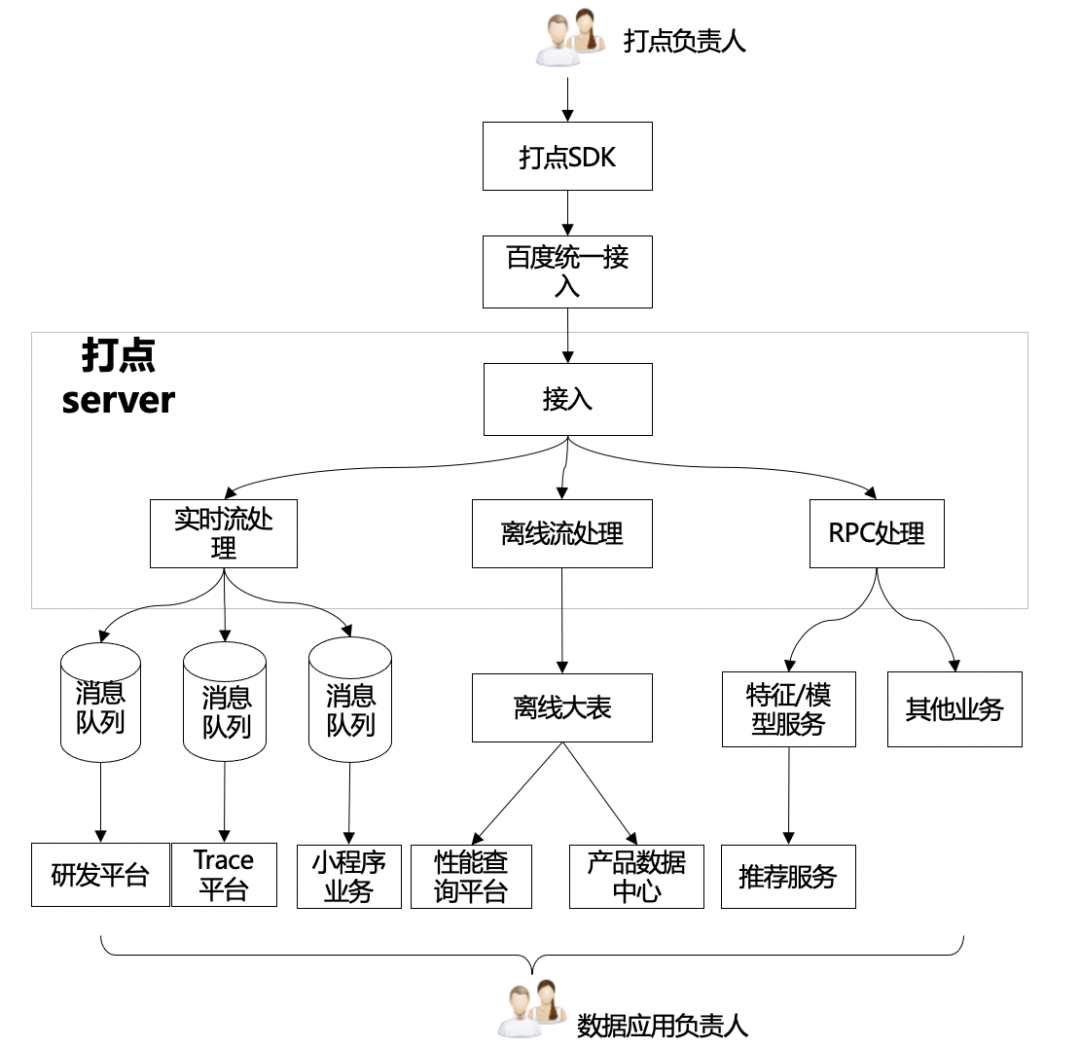
数据应用方式不同,有以下集中类型:
实时
准实时流(消息队列):供下游数据分析使用,特点:较高(min)时效性,需要严格意义的数据准确。典型应用:研发平台、trace平台;
纯实时流(RPC代理):供下游策略应用,特点:秒级时效性,允许一定程度的数据丢失。典型应用:推荐架构。
离线:离线大表,所有日志全集,特点:天级/小时级时效性,需要严格意义的数据准确。
其他:需要一定时效性和准确率
2.2 面临的问题
从上面日志中台架构来看,存在如下问题:
巨型模块:打点server承载了所有的数据处理逻辑,功能耦合严重:
功能多:接入&持久化、业务逻辑处理、各种类型转发(rpc、消息队列、pb落盘);
扇出多:有10+个业务扇出流,通过打点server转发。
直接对接消息队列:从业务视角看,存在发送消息队列消息丢失风险,且无法满足业务不重不丢要求。
业务无等级划分:
核心业务与非核心业务架构部署耦合
相互迭代、相互影响
三、不重不丢实现
3.1 数据不丢的理论基础

3.1.1 唯2丢失数据理论
端:由于移动端的客观环境影响,如白屏、闪退、无法常驻进程、启动周期不确定等因素,导致客户端消息会存在一定概率丢失
接入层:由于服务器不可避免的存在故障(服务重启、服务器故障)的可能性,也存在一定的数据丢失概率
计算层:接入点之后,基于流式框架,建设需要严格意义的保证数据不重不丢。
3.1.2 日志中台架构优化方向
数据接入层面:
先持久化数据,后业务处理的原则
降低逻辑复杂度
下游转发层面:
实时流类:严格意义不丢失
高时效类:保证数据时效,允许可能存在的部分丢失
资源隔离:将不同业务的部署进行物理隔离,避免不同业务相互影响
区分优先级:按照业务对不同数据诉求,区分不同类型
3.2 架构拆解
基于日志中台现状分析,结合日志打点服务的唯2理论,我们针对日志中台对现有架构进行问题拆解和架构重构。
3.2.1 打点server服务拆解(优化接入层数据丢失)
基于以上不重不丢的理论,日志接入层进行了如下几个方面的建设,尽可能做到数据不重不丢。
日志优先持久化:尽可能降低接入点因服务器故障等原因导致的数据丢失问题;
巨型服务拆解:接入点应该秉承简单、轻量的思路建设,避免过多业务属性导致的服务稳定性问题;
灵活&易用:在不重不丢的同时,基于业务需求特点,设计合理的流式计算架构。
会员系统的架构设计ES+Redis+MySQL,这套组合可应对80%业务场景
星期二, 2022-04-19 | Author: Lee | JAVA-and-J2EE | 没有评论 1,426 views
来源于: 同程和艺龙的会员中心系统,讲述了会员系统的数据库切换 ES主备,Redis等配置策略及实际遇到的问题的对应方法,有很不错的实战意义,记录在此后续参考应用.感谢原作者.
一、背景
会员系统是一种基础系统,跟公司所有业务线的下单主流程密切相关。如果会员系统出故障,会导致用户无法下单,影响范围是全公司所有业务线。所以,会员系统必须保证高性能、高可用,提供稳定、高效的基础服务。
随着同程和艺龙两家公司的合并,越来越多的系统需要打通同程APP、艺龙APP、同程微信小程序、艺龙微信小程序等多平台会员体系。例如微信小程序的交叉营销,用户买了一张火车票,此时想给他发酒店红包,这就需要查询该用户的统一会员关系。因为火车票用的是同程会员体系,酒店用的是艺龙会员体系,只有查到对应的艺龙会员卡号后,才能将红包挂载到该会员账号。除了上述讲的交叉营销,还有许多场景需要查询统一会员关系,例如订单中心、会员等级、里程、红包、常旅、实名,以及各类营销活动等等。所以,会员系统的请求量越来越大,并发量越来越高,今年五一小长假的秒并发tps甚至超过2万多。在如此大流量的冲击下,会员系统是如何做到高性能和高可用的呢?这就是本文着重要讲述的内容。
二、ES高可用方案
1. ES双中心主备集群架构
同程和艺龙两家公司融合后,全平台所有体系的会员总量是十多亿。在这么大的数据体量下,业务线的查询维度也比较复杂。有的业务线基于手机号,有的基于微信unionid,也有的基于艺龙卡号等查询会员信息。这么大的数据量,又有这么多的查询维度,基于此,我们选择ES用来存储统一会员关系。ES集群在整个会员系统架构中非常重要,那么如何保证ES的高可用呢?
首先我们知道,ES集群本身就是保证高可用的,如下图所示:
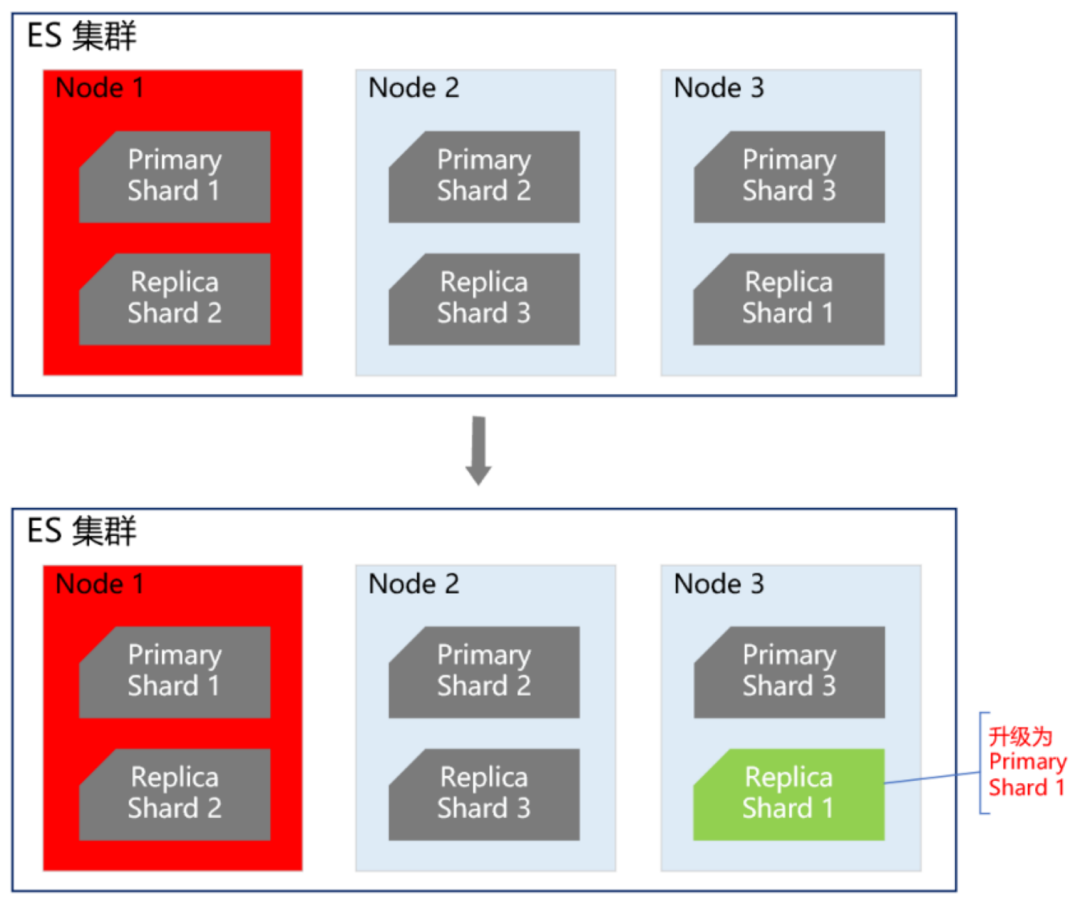
当ES集群有一个节点宕机了,会将其他节点对应的Replica Shard升级为Primary Shard,继续提供服务。但即使是这样,还远远不够。例如ES集群都部署在机房A,现在机房A突然断电了,怎么办?例如服务器硬件故障,ES集群大部分机器宕机了,怎么办?或者突然有个非常热门的抢购秒杀活动,带来了一波非常大的流量,直接把ES集群打死了,怎么办?面对这些情况,让运维兄弟冲到机房去解决?这个非常不现实,因为会员系统直接影响全公司所有业务线的下单主流程,故障恢复的时间必须非常短,如果需要运维兄弟人工介入,那这个时间就太长了,是绝对不能容忍的。那ES的高可用如何做呢?我们的方案是ES双中心主备集群架构。
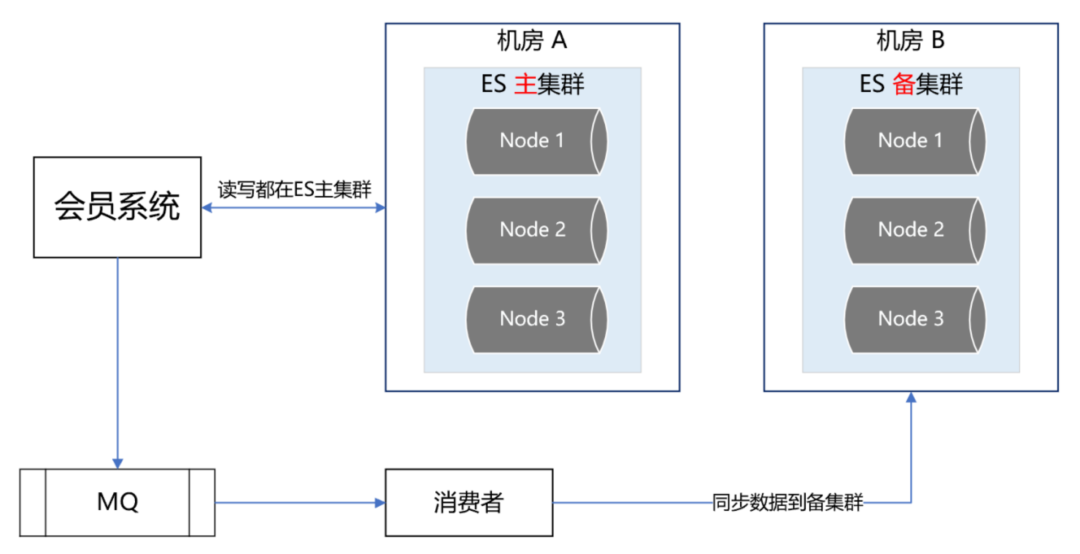
我们有两个机房,分别是机房A和机房B。我们把ES主集群部署在机房A,把ES备集群部署在机房B。会员系统的读写都在ES主集群,通过MQ将数据同步到ES备集群。此时,如果ES主集群崩了,通过统一配置,将会员系统的读写切到机房B的ES备集群上,这样即使ES主集群挂了,也能在很短的时间内实现故障转移,确保会员系统的稳定运行。最后,等ES主集群故障恢复后,打开开关,将故障期间的数据同步到ES主集群,等数据同步一致后,再将会员系统的读写切到ES主集群。
› 继续阅读
mysql5.5版本数据类型、索引、查询的优化技巧(5.7版本适用)
星期三, 2022-04-13 | Author: Lee | Database, JAVA-and-J2EE | 没有评论 1,103 views
mysql5.5版本数据类型、索引、查询的优化技巧(5.7版本适用)
总结一些MySQL的常见使用技巧,以供没有DBA的团队参考。以下内容以MySQL5.5为准,如无特殊说明,存储引擎以InnoDB为准。
最新版8.0已经优化很多了,比如尽量使用子查询等,不断实践才能验证,做好数据压测即可检测.
本文大纲:
MySQL的特点
数据类型优化
索引优化
查询优化
一、MySQL的特点
了解MySQL的特点有助于更好的使用MySQL,MySQL和其它常见数据库最大的不同在于存在存储引擎这个概念,存储引擎负责存储和读取数据。不同的存储引擎具有不同的特点,用户可以根据业务的特点选择适合的存储引擎,甚至是开发一个新的引擎。
MySQL的逻辑架构大致如下:
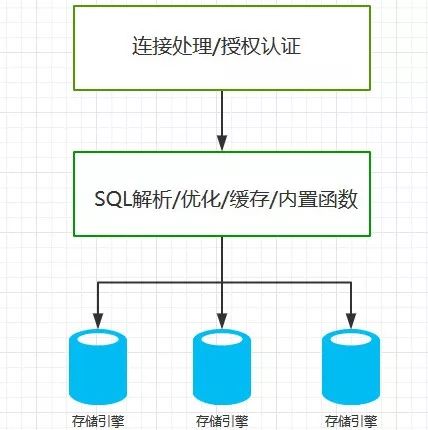
MySQL默认的存储引擎是InnoDB,该存储引擎的主要特点是:
支持事务处理
支持行级锁
数据存储在表空间中,表空间由一些列数据文件组成
采用MVVC(多版本并发控制)机制实现高并发
表基于主键的聚簇索引建立
支持热备份
其它常见存储引擎特点概述:
MyISAM:老版本MySQL的默认引擎,不支持事务和行级锁,开发者可以手动控制表锁;支持全文索引;崩溃后无法安全恢复;支持压缩表,压缩表数据不可修改,但占用空间较少,可以提高查询性能
Archive:只支持Insert和Select,批量插入很快,通过全表扫描查询数据
SCV:把一个SCV文件当做一个表处理
Memory:数据存储在内存中
还有很多,不再一一列举。
二、数据类型优化
选择数据类型的原则:
选择占用空间小的数据类型
选择简单的类型
避免不必要的可空列
占用空间小的类型更节省硬件资源,如磁盘、内存和CPU。
尽量使用简单的类型,如能用int就不用char,因为后者的排序涉及到字符集的选择,比使用int复杂。
可空列使用更多的存储空间,如果在可空列上创建索引,MySQL需要额外的字节做记录。
创建表时,默认都是可空,容易被开发者忽视,最好是手动改为不可空,如果要存储的数据确实不会有空值的话。
1、整型类型
整型类型包括:
tinyint SMALLINT mediumint INT BIGINT |
它们分别使用8、16、24、32和64位存储数字,它们可以表示−2n−1−2n−1到2n−1−12n−1−1范围的数字,前面可以加unsigned修饰,这样可以让正数的可表示范围提高1倍,但是无法表示负数。
另外,为整型指定长度没什么卵用,数据类型定下来,长度也就相应定下来了。
2、小数类型
FLOAT DOUBLE DECIMAL |
float和double就是通常意义上的float和double,前者使用32位存储数据,后者使用64位存储数据,和整型一样,为它们指定长度没什么卵用。
decimal类型比较复杂,支持精确计算,占用的空间也大,decimal使用每4个字节表示9个数字,如decimal(18,9)表示数字长度是18,其中小数位9个数字,整数部分9个数字,加上小数点本身,共占用9个字节。
考虑到decimal占用空间较多,以及精度计算很复杂,数据量大的时候可以考虑用bigint代替之,可以在持久化和读取前对真实数据进行一些缩放操作。
3、字符串类型
VARCHAR CHAR varbinary BINARY BLOB text |
枚举
varchar类型数据实际占用空间等于字符串的长度加上1个或2个用来记录字符串长度的字节(当row-format没有被设置为fixed时),varchar很节省空间。当表中某列字符串类型的数据长度差别较大时适合使用varchar。
char的实际占用空间是固定的,当表中字符串数据的长度相差无几或很短时适合使用chart类型。
与varchar和char对应的有varbinary和binary,后者存储的是二进制字符串,和前者相比,后者大小写敏感,不用考虑编码方式,执行比较操作时更快。
需要注意的是:虽然varchar(5)和varchar(200)在存储“hello”这个字符串时使用相同的存储空间,但并不意味着将varchar的长度设置太大不会影响性能,实际上,MySQL的某些内部计算,比如创建内存临时表时(某些查询会导致MySQL自动创建临时表),会分配固定大小的空间存放数据。
blob使用二进制字符串保存大文本,text使用字符保存大文本,InnoDB会使用专门的外部存储区来存放此类数据,数据行内仅存放指向他们的指针,此类数据不宜创建索引(要创建也只能正对字符串前缀创建),不过也不会有人这么干。
如果某列字符串大量重复且内容有限,可使用枚举代替,MySQL处理枚举时维护了一个“数字-字符串”表,使用枚举可以减少很多存储空间。
4、时间类型
YEAR DATE TIME datetime TIMESTAMP |
datetime存储范围是1001到9999,精确到秒。
timestamp存储1970年1月1日午夜以来的秒数,可以表示到2038年。占用4个字节,是datetime占用空间的一半。timestamp表示的时间和时区有关,另外timestamp列还有个特性,执行insert或update语句时,MySQL会自动更新第一个类型为timestamp的列的数据为当前时间。
很多表中都有设计有一列叫做UpdateTime,这个列使用timestamp倒是挺合适的,会自动更新,前提是系统不会使用到2038年。
5、主键类型的选择
尽可能使用整型,整型占用空间少,还可以设置为自动增长。尤其别使用GUID,MD5等哈希值字符串作为主键,这类字符串随机性很大,由于InnoDB主键默认是聚簇索引列,所以导致数据存储太分散。
另外,InnoDB的二级索引列中默认包含主键列,如果主键太长,也会使得二级索引很占空间。
6、特殊类型的数据
存储IP最好使用32位无符号整型,MySQL提供了函数inet_aton()和inet_ntoa()进行IP地址的数字表示和字符串表示之间的转换。
三、索引优化
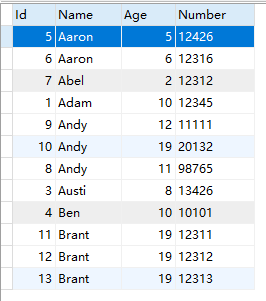
InnoDB使用B+树实现索引,举个例子,假设有个People,建表语句如下
CREATE TABLE `people` ( `Id` INT(11) NOT NULL AUTO_INCREMENT, `Name` VARCHAR(5) NOT NULL, `Age` tinyint(4) NOT NULL, `Number` CHAR(5) NOT NULL COMMENT '编号', PRIMARY KEY (`Id`), KEY `i_name_age_number` (`Name`,`Age`,`Number`) ) ENGINE=InnoDB AUTO_INCREMENT=14 DEFAULT CHARSET=utf8; |
插入数据:
它的索引结构大致是这样的:
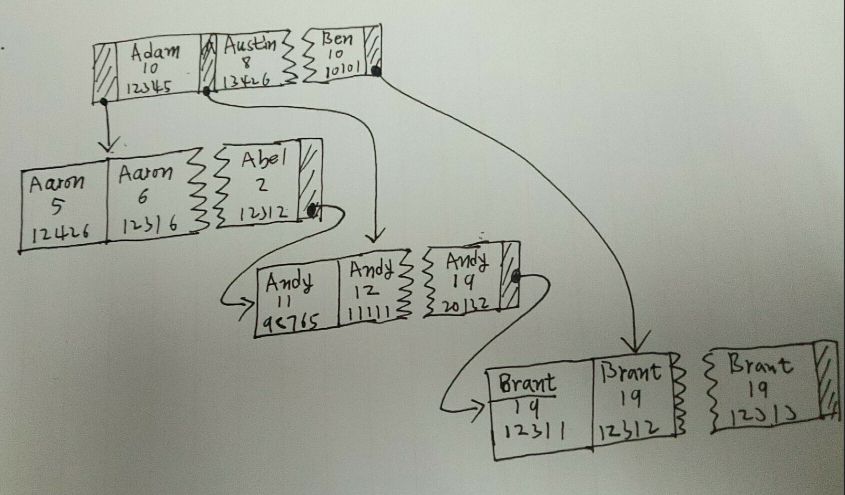
也就是说,索引列的顺序很重要,如果两行数据的Name列相同,则用Age列比较大小,如果Age列相同,则用Number列比较大小。先用第一列排序,然后是第二列,最后是第三列。
查询的使用应该尽量从左往右匹配,另外,如果左边列范围查找,右边列无法使用索引;还有就是不能隔列查询,否则后面的索引也无法使用到。如以下几个SQL是正面范例:
SELECT * FROM people WHERE Name ='Abel' AND Age = 2 AND NUMBER = 12312 SELECT * FROM people WHERE Name ='Abel' SELECT * FROM people WHERE Name LIKE 'Abel%' SELECT * FROM people WHERE Name = 'Andy' AND Age BETWEEN 11 AND 20 SELECT * FROM people ORDER BY NAME SELECT * FROM people ORDER BY NAME, Age SELECT * FROM people GROUP BY Name |
以下几个SQL是反面范例:
SELECT * FROM people WHERE Age = 2 SELECT * FROM people WHERE NAME LIKE '%B' SELECT * FROM people WHERE age = 2 SELECT * FROM people WHERE NAME = 'ABC' AND NUMBER = 3 SELECT * FROM people WHERE NAME LIKE 'B%' AND age = 22 |
1、一个使用Hash值创建索引的技巧
如果表中有一列存储较长字符串,假设名字为URL,在此列上创建的索引比较大,有个办法可以缓解:创建URL字符串的数字哈希值的索引。再新建一个字段,比如叫做URL_CRC,专门放置URL的哈希值,然后给这个字段创建索引,查询时这样写:
SELECT * FROM t WHERE URL_CRC = 387695885 AND URL = 'www.baidu.com' |
如果数据量比较多,为防止哈希冲突,可自定义哈希函数,或用MD5函数返回值的一部分作为哈希值:
SELECT CONV(RIGHT(MD5('www.baidu.com'),16), 16, 10) |
2、前缀索引
如果字符串列存储的数据较长,创建的索引也很大,这时可以使用前缀索引,即:只针对字符串前几个字符做索引,这样可以缩短索引的大小,不过,显然,此类索引在执行order by和group by时不起作用。
创建前缀索引时选择前缀长度很重要,在不破坏原来数据分布的情况下尽可能选择较短的前缀。举个例子,如果如果大部分字符串是以”abc”开头,那么如果限定前缀索引长度为4,索引值会包含太多的重复的”abcX”。
3、多列索引
上面提到的“People”上创建的索引即为多列索引,多列索引往往比多个单列索引更好。
对多个索引进行and查询时,应该创建多列索引,而不是多个单列索引。
可以试试这样写的效果:
SELECT * FROM t WHERE f1 = 'v1' AND f2 <> 'v2' UNION ALL SELECT * FROM t WHERE f2 = 'v2' AND f1 <> 'v1' |
多列索引的顺序很重要,通常,不考虑排序和分组查询时,应该把选择性(选择性是指某表索引列不同数据的个数/总行数。选择性高意味着重复数据少)大的列放到前面。但也有例外,如果能确认某些查询是频繁执行的,则应该优先照顾这些查询的选择性,比如,如果上面的People表中Name的选择性大于Age,查询语句应该这样写:
SELECT * FROM people WHERE name = 'xxx' AND age = xx |
Name列放了索引中的左侧比较合适,但是如果某个SQL执行的评率最高,比如:
SELECT * FROM people WHERE name = 'xxx' AND age = 20 |
当age=20的记录在数据库中非常少时,反而把age放到索引列的左端效率更高。把age放了索引左端可能对其它age不等于20的查询来说不公平,如果不能确定age=20是最非常频繁的查询条件,还是要综合考虑,把name放了左侧合适。
4、聚簇索引
聚簇索引是一种数据存储结构,InnoDB在主键的索引的叶子节点中直接保存了数据行,而不是像二级索引那样只是保存了索引列的值和所指向行的主键值。由于这个特性,一个表只能有一个聚簇索引。如果一个表没有定义主键也没有定义具有唯一索引的列,那么InnoDB会生成一个隐藏列,并且在此列设为聚簇索引列。
5、覆盖索引
简单地说,某些查询只需要查询索引列,那么就不用再根据索引B树节点记录的主键ID进行二次查询了。
6、重复索引和冗余索引
如果重复在某列创建索引,并不会带来任何好处,只有坏处,应该尽量避免。比如给主键创建唯一索引和普通索引就是多于的,因为InnoDB的主键默认就是聚簇索引了。
冗余索引和重复索引不同,比如某个索引是(A,B),另一个索引是(A),这叫冗余索引,前者可以代替后者,后者不可以代替前者的作用。但是(A,B)和(B)以及(A,B)和(B,A)不算冗余索引,起作用谁也代替不了谁。
如果一个表中已经存在索引(A),现在又想创建索引(A,B),那么只需扩展就的索引就可以,没有必要创建新的索引。需要注意的是如果已经存在索引(A),那么也没有必要在创建索引(A,ID),其中ID指主键,因为索引A默认已经包含了主键了,也算是冗余主键。
但是,有时候,冗余索引也是可取的,假设已经存在索引(A),将其扩展为(A,B)后,因为B列是一个很长的类型,导致用A单独查询时没有以前快了,这时可以考虑新创建索引(A,B)。
7、不使用的索引
不使用的索引徒然增加insert、update和delete的效率,应该及时删除。
8、索引使用总结
索引的三星原则:
索引将查询相关的记录按顺序放在一起则得一星
索引中的数据顺序和查询结果的排序一致则得一星
索引中包含了查询所需要的全部列则得一星
第一个条原则的意思是where条件中查询的顺序和索引是一致的,就是前面说的从左到右使用索引。
索引不是万能的,当数据量巨大时,维护索引本身也是耗费性能的,应该考虑分区分表存储。
四、查询优化
› 继续阅读
免安装软件PDF文件简单页面删减编辑
星期二, 2022-04-12 | Author: Lee | computer | 没有评论 861 views
1.其他收费的PDF编辑软件就不推荐了,还要安装比较麻烦
2.我的需求比较简单,就算把原来PDF文件中删除几页,把一个PDF文件分成几个小的PDF
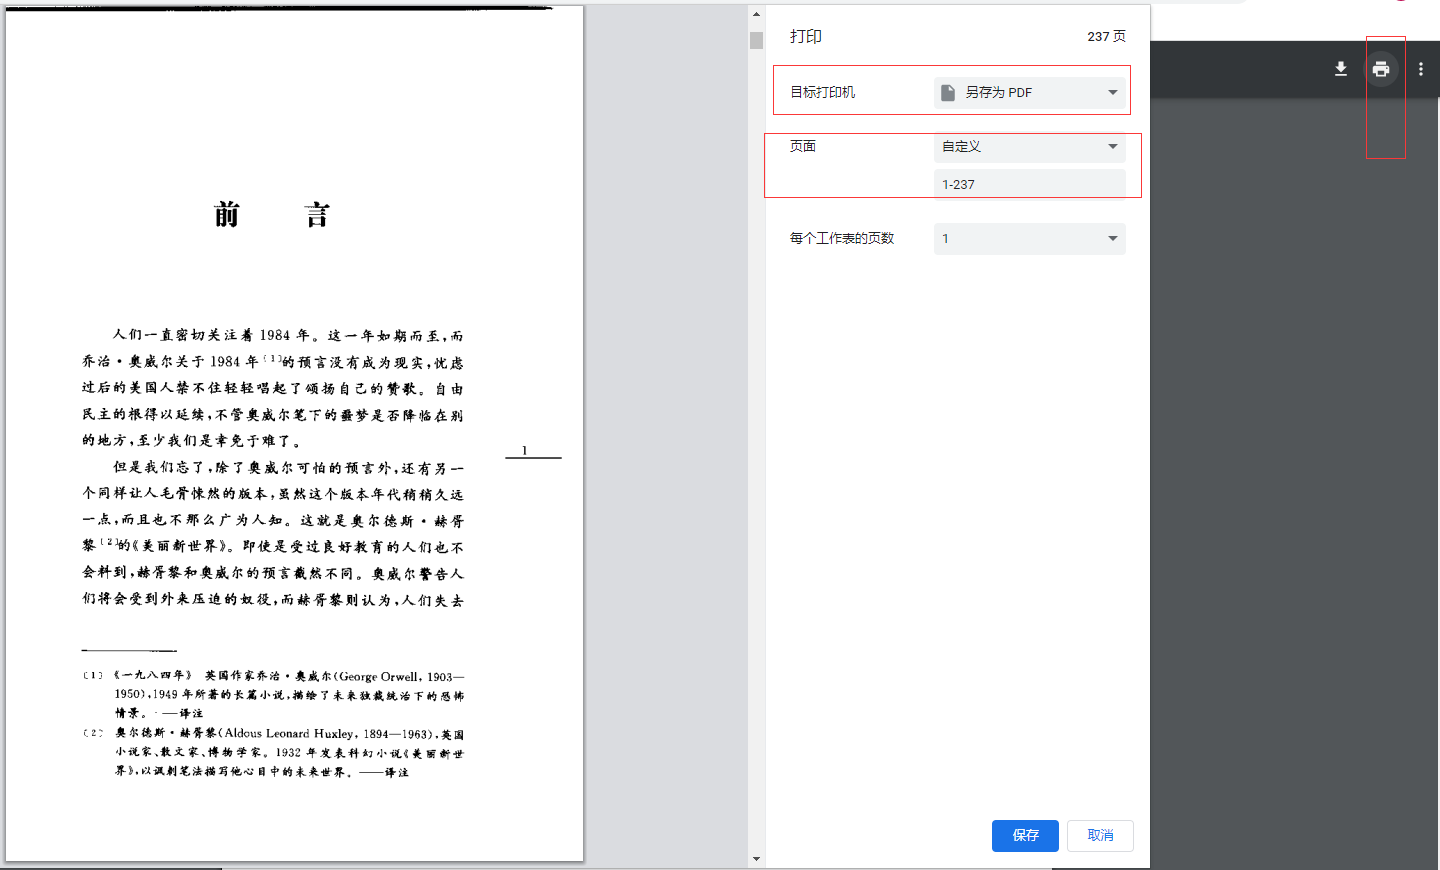
3.使用谷歌浏览器打开PDF,选择右侧的打印,里面有另存为PDF,再选定指定的页面即可
4.不需要安装其他软件用浏览器就可以搞定了.
5.如图所示
切换阿里云Maven的仓库提升编译速度
星期六, 2022-01-08 | Author: Lee | JAVA-and-J2EE, linux | 没有评论 858 views
1.更多配置可以可以参考阿里云云效 Maven https://developer.aliyun.com/mvn/guide
2.通常配置如下:修改Maven的settings.xml文件
<mirrors> <mirror> <id>alimaven</id> <mirrorOf>central</mirrorOf> <name>aliyun maven</name> <url>https://maven.aliyun.com/repository/public/</url> </mirror> </mirrors> |
2.或者直接在pom.xml文件中更换
<repositories> <repository> <id>alimaven</id> <name>aliyun maven</name> <url>https://maven.aliyun.com/repository/public</url> </repository> </repositories> |
Mac下遭遇JDK-11.0.1.jdk已经损坏,无法打开修复
星期一, 2021-12-13 | Author: Lee | JAVA-and-J2EE, mac | 没有评论 2,663 views
1.其实不是文件损坏,而是mac的权限管控问题
2.系统偏好设置-安全性和隐私 授予任何程序执行
3.使用对应命令解决
sudo xattr -rc /Library/Java/JavaVirtualMachines/jdk-11.0.1.jdk/ ./bin/java -version |
centos7安装docker和docker compose快速指引
星期三, 2021-12-01 | Author: Lee | JAVA-and-J2EE, linux | 没有评论 959 views
1. 安装之前,先清除之前安装的旧版本docker
sudo yum remove docker docker-client docker-client-latest docker-common docker-latest docker-latest-logrotate docker-logrotate docker-selinux docker-engine-selinux docker-engine |
2. 使用 repository 安装 docker ce
##安装基础依赖包 sudo yum install -y yum-utils device-mapper-persistent-data lvm2 不建议// sudo yum-config-manager --add-repo https://download.docker.com/linux/centos/docker-ce.repo ## 官方给出的源,国内比较慢,可以用阿里源替代 ## 阿里源,国内速度优先 sudo yum-config-manager --add-repo http://mirrors.aliyun.com/docker-ce/linux/centos/docker-ce.repo ## 如果想安装指定版本的docker-ce,可以先用命令查看版本号 sudo yum list docker-ce --showduplicates | sort -r ## 直接运行会默认安装最新版 sudo yum install docker-ce ## 安装指定版本,例如:yum install docker-ce-20.10.11 sudo yum install docker-ce-<version STRING> ###创建配置信息 sudo mkdir /etc/docker sudo cat > /etc/docker/daemon.json <<eof { "exec-opts": ["native.cgroupdriver=systemd"], "log-driver": "json-file", "log-opts": { "max-size": "100m" }, "storage-driver": "overlay2", "storage-opts": [ "overlay2.override_kernel_check=true" ] } EOF |
3. 安装 docker-compose不使用pip安装,直接用编译好的
curl -L https://github.com/docker/compose/releases/download/1.29.2/docker-compose-`uname -s`-`uname -m` -o /usr/local/bin/docker-compose chmod +x /usr/local/bin/docker-compose |
上面安装的是稳定版本1.29.2的 docker-compose,可以到github上找最新版 https://github.com/docker/compose/releases
配置docker-compose命令关联
› 继续阅读

Search
相关文章
热门文章
最新文章
文章分类
- ajax (10)
- algorithm-learn (3)
- Android (6)
- as (3)
- computer (86)
- Database (30)
- disucz (4)
- enterprise (1)
- erlang (2)
- flash (5)
- golang (3)
- html5 (18)
- ios (4)
- JAVA-and-J2EE (186)
- linux (144)
- mac (10)
- movie-music (11)
- pagemaker (36)
- php (50)
- spring-boot (2)
- Synology群晖 (2)
- Uncategorized (7)
- unity (1)
- webgame (15)
- wordpress (33)
- work-other (2)
- 低代码 (1)
- 体味生活 (40)
- 前端 (21)
- 大数据 (8)
- 游戏开发 (9)
- 爱上海 (19)
- 读书 (4)
- 软件 (3)