centos
linux、centos等配置不输入密码切换sudo指令
星期二, 五月 16th, 2023 | JAVA-and-J2EE, linux | 没有评论
使用 pkexec 安全配置指定用户不输入密码切换sudo su指令
1.pkexec su可进入你的root
pkexec visudo 进入visudo命令
直接编辑修改
ctrl + x 保存退出
编辑的也是此文件,在对应的用户前面加上NOPASSWD即可
在/etc/sudoers文件
sa ALL=(ALL) NOPASSWD:ALL
2.小问题修复 为了能编辑/etc/sudoers 执行给了777权限
出现如下错误
sudo: /etc/sudoers is world writable
sudo: no valid sudoers sources found, quitting
sudo: unable to initialize policy plugin
修复此错误:
pkexec chmod 0440 /etc/sudoers |
centos7下yum安装PHP 7.4, 7.3 & 7.2 & 7.1
星期二, 三月 9th, 2021 | linux, php | 没有评论
centos7下yum安装PHP 7.4, 7.3 & 7.2 & 7.1
1.系统为centos7.9
2.使用yum安装 命令如下:
sudo yum install epel-release sudo rpm -Uvh http://rpms.famillecollet.com/enterprise/remi-release-7.rpm |
2.1:安装php版本
## Install PHP 7.4 yum --enablerepo=remi-php74 install php ## Install PHP 7.3 yum --enablerepo=remi-php73 install php ## Install PHP 7.2 yum --enablerepo=remi-php72 install php ## Install PHP 7.1 yum --enablerepo=remi-php71 install php |
2.2 安装php相关常用扩展(Modules)
### For PHP 7.4 yum --enablerepo=remi-php74 install php-xml php-soap php-xmlrpc php-mbstring php-json php-gd php-mcrypt ### For PHP 7.3 yum --enablerepo=remi-php73 install php-xml php-soap php-xmlrpc php-mbstring php-json php-gd php-mcrypt ### For PHP 7.2 yum --enablerepo=remi-php72 install php-xml php-soap php-xmlrpc php-mbstring php-json php-gd php-mcrypt ### For PHP 7.1 yum --enablerepo=remi-php71 install php-xml php-soap php-xmlrpc php-mbstring php-json php-gd php-mcrypt |
2.3 支持mysql及php-fpm
## For PHP 7.4 yum --enablerepo=remi-php74 install php-fpm mysqlnd ## For PHP 7.3 yum --enablerepo=remi-php73 install php-fpm mysqlnd ## For PHP 7.2 yum --enablerepo=remi-php72 install php-fpm mysqlnd ## For PHP 7.1 yum --enablerepo=remi-php71 install php-fpm mysqlnd |
2.4 查看更多可安装的模块
centos7.x配置安装chrome+chromedriver+selenium
星期四, 十二月 31st, 2020 | JAVA-and-J2EE, linux | 没有评论
1.系统centos7.x
下载chrome
wget https://dl.google.com/linux/direct/google-chrome-stable_current_x86_64.rpm |
2. 安装chrome
yum -y install ./google-chrome-stable_current_x86_64.rpm |
2.1.Installed:
google-chrome-stable.x86_64 0:87.0.4280.88-1
查看chrome版本号
[root@localhost soft]# google-chrome --version Google Chrome 87.0.4280.88 |
3.下载对应的chromedriver(87.0.4280.88)版本要保持一致
wget https://npm.taobao.org/mirrors/chromedriver/87.0.4280.88/chromedriver_linux64.zip #解压chromedriver_linux64.zip unzip chromedriver_linux64.zip mv chromedriver /usr/bin/ |
4. 后续使用selenium等就可以愉快的使用了
5.修复中文方块问题
中文字体问题:下载宋体simsun,或者其他字体
把文件放到
/usr/share/fonts/simsun.ttc ##执行命令 fc-cache -fv |
成功后即可
VirtualBox下centos7修复generating /run/initramfs/rdsosreport.txt无法启动问题
星期二, 四月 28th, 2020 | computer, linux | 没有评论
开机就进入命令窗口,窗口提示信息如下,无法进入系统,让人头大:
generating “/run/initramfs/rdsosreport.txt”
entering emergencymode. exit the shell to continue
type “journalctl” to view system logs.
you might want to save “/run/initramfs/rdsosreport.txt” to a usb stick or /boot after mounting them and attach it to a bug report。
解决办法的命令如下:
xfs_repair /dev/mapper/centos-root -L reboot |
centos8版本快速部署nginx,mysql安装
星期二, 一月 21st, 2020 | JAVA-and-J2EE, linux | 没有评论
0.centos8版本快速部署nginx,mysql安装
1.系统预检 查看版本
cat /etc/redhat-release |
初始系统为8.0版本,执行更新后为8.1:
yum update cat /etc/redhat-release |
CentOS Linux release 8.1.1911 (Core)
› Continue reading
centos下jdk11及jdk8的环境变量配置
星期三, 十一月 20th, 2019 | JAVA-and-J2EE, linux | 一条评论
0.最新的下载地址
Oracle 官方下载地址:https://www.oracle.com/technetwork/java/javase/downloads/index.html
国内镜像仓库华为:https://repo.huaweicloud.com/java/jdk/
由于Oracle JDK 11 的许可证的变化,生产环境需要使用OpenJDK 11(以免甲骨文律师信警告^o^)
亚马逊的编译版本下载地址(corretto):https://aws.amazon.com/cn/corretto/
adoptopenjdk编译的版本下载:https://adoptopenjdk.net/
1.配置jdk11、jdk12的 /etc/profile文件最后面追加即可,
jdk9后续版本将不再有jre及classpath要配置了
vi /etc/profile export JAVA_HOME=/usr/local/webserver/jdk/jdk-11.0.5 export PATH=$PATH:$JAVA_HOME/bin |
后续source 生效
source /etc/profile java -version |
2.配置jdk8的配置文件
tar zxvf jdk-8u231-linux-x64.tar.gz mv jdk1.8.0_231 /usr/local/java/ vi /etc/profile export JAVA_HOME=/usr/local/java/jdk1.8.0_231 export JRE_HOME=/usr/local/java/jdk1.8.0_231/jre export CLASSPATH=.:$CLASSPATH:$JAVA_HOME/lib:$JRE_HOME/lib export PATH=$PATH:$JAVA_HOME/bin:$JRE_HOME/bin |
golang开发环境快速搭建centos版本
星期二, 十一月 12th, 2019 | golang | 没有评论
1.用golang写过一些工具,每次要开发工具的时候还要去弄下对应的环境,记录下,好随时翻阅
这里使用的是centos8,window版本直接配置即可
2.官网下载二进制安装包,现在有国内可以访问的地址了
wget https://dl.google.com/go/go1.13.4.linux-amd64.tar.gz mkdir -p /usr/local/golang/opt/ tar -C /usr/local/golang/opt/ -zxvf go1.13.4.linux-amd64.tar.gz mkdir -p /usr/local/golang/repos/gopath/ |
3.设置环境变量填写如下地址
vi /etc/profile export GOROOT=/usr/local/golang/opt/go export GOPATH=/usr/local/golang/repos/gopath export PATH=$PATH:$GOROOT/bin source /etc/profile go version |
4.编写hello.go文件测试
cd /usr/local/golang/repos/gopath vi hello.go package main import "fmt" func main(){ fmt.Printf("hello,world\n"); } |
5.运行及编译
go run hello.go go build hello.go ./hello |
6.解决不翻墙go get之类的net包问题
mkdir -p $GOPATH/src/golang.org/x/ cd $GOPATH/src/golang.org/x/ yum install git git clone https://github.com/golang/net.git net go install net |
执行go install之后没有提示,就说明安装好了。
7.后续就各种api 开发吧
https://golang.google.cn/doc/
centos8的最小化安装及更换yum地址
星期二, 十一月 12th, 2019 | linux | 没有评论
1.centos8的下载地址
http://isoredirect.centos.org/centos/8/isos/x86_64/
选择CentOS-8-x86_64-1905-boot.iso下载这个比较小只有500M多点
DVD版本太大了6.6G的样子,想安装省事可以直接下载这个CentOS-8-x86_64-1905-dvd1.iso 版本
2.这里选择是阿里云的下载地址
centos8用于网络安装的镜像文件 https://mirrors.aliyun.com/centos/8/isos/x86_64/CentOS-8-x86_64-1905-boot.iso 534M
完整安装包要 6.64G https://mirrors.aliyun.com/centos/8/isos/x86_64/CentOS-8-x86_64-1905-dvd1.iso
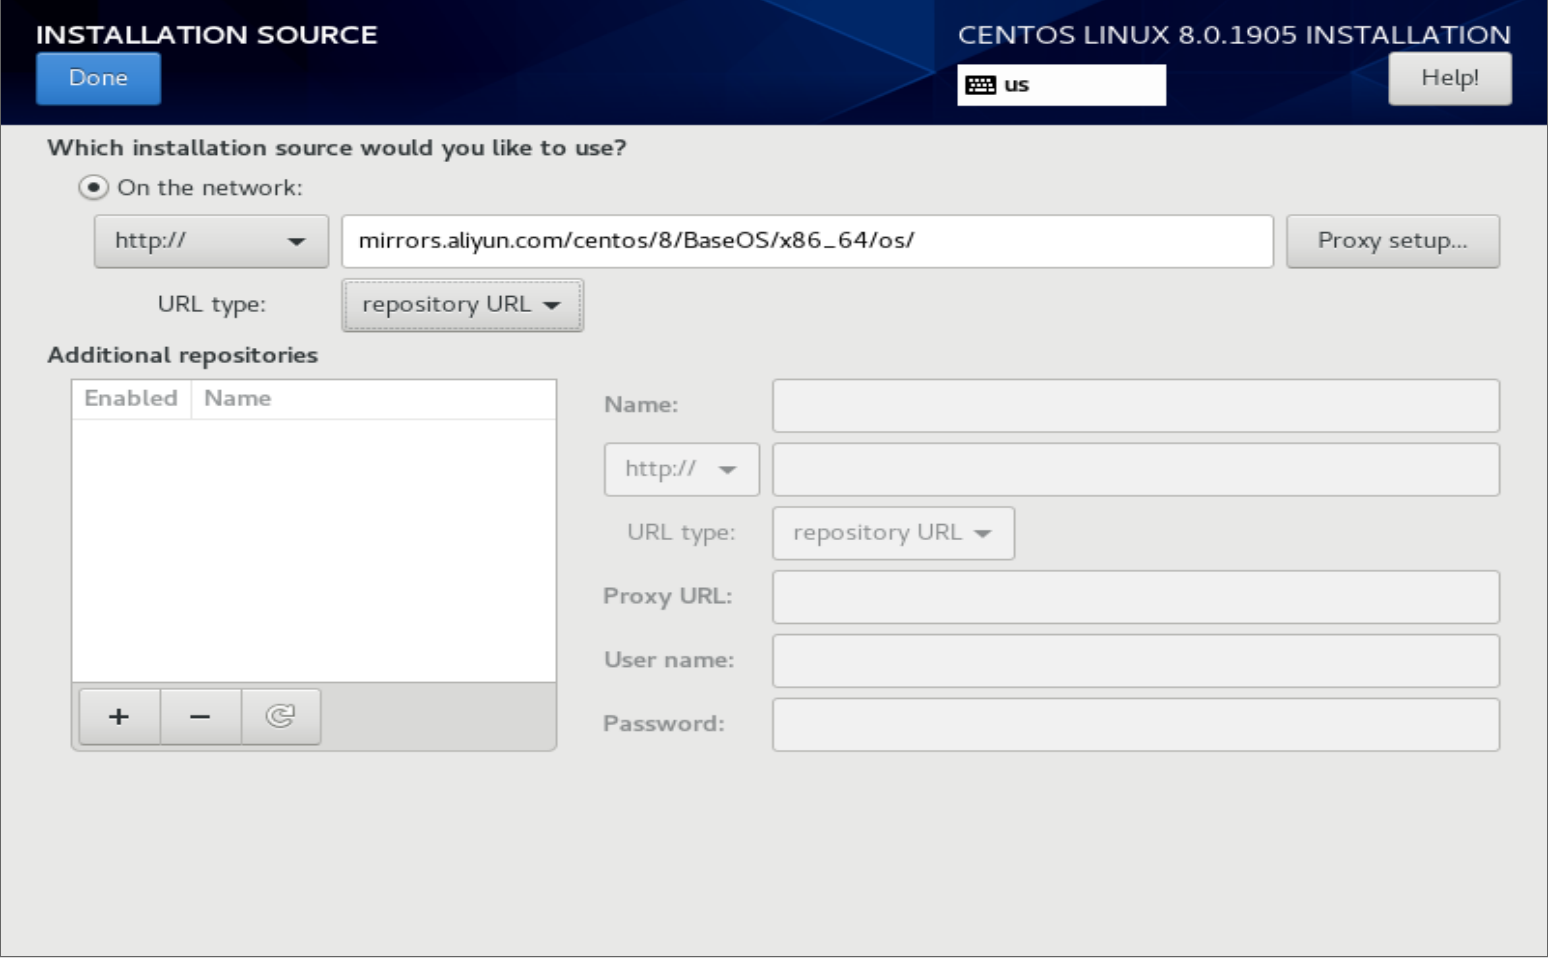
3.安装界面先配置下网络点选下即可,主要是配置安装源 如下图配置即可
网络地址填写下面即可:http://mirrors.aliyun.com/centos/8/BaseOS/x86_64/os/
4.后续安装就等待即可,设置下root和账号密码等
5.更新yum源头及安装下网络工具
yum install net-tools |
可以使用 netstat -lntp工具了
cd /etc/yum.repos.d vi CentOS-Base.repo ## 修改为如下内容 CentOS-Base.repo [BaseOS] name=CentOS-$releasever - Base #mirrorlist=http://mirrorlist.centos.org/?release=$releasever&arch=$basearch&repo=BaseOS&infra=$infra #baseurl=http://mirror.centos.org/$contentdir/$releasever/BaseOS/$basearch/os/ baseurl=https://mirrors.aliyun.com/centos/$releasever/BaseOS/$basearch/os/ gpgcheck=1 enabled=1 gpgkey=file:///etc/pki/rpm-gpg/RPM-GPG-KEY-centosofficial vi CentOS-AppStream.repo ## CentOS-AppStream.repo [AppStream] name=CentOS-$releasever - AppStream #mirrorlist=http://mirrorlist.centos.org/?release=$releasever&arch=$basearch&repo=AppStream&infra=$infra #baseurl=http://mirror.centos.org/$contentdir/$releasever/AppStream/$basearch/os/ baseurl=https://mirrors.aliyun.com/centos/$releasever/AppStream/$basearch/os/ gpgcheck=1 enabled=1 gpgkey=file:///etc/pki/rpm-gpg/RPM-GPG-KEY-centosofficial yum makecache |
CentOS6.5安装配置postfix邮件系统 启用并配置SMTP虚拟账户
星期三, 三月 9th, 2016 | JAVA-and-J2EE, linux, php | 一条评论
CentOS6.5_64位系统下安装配置postfix邮件系统 启用并配置SMTP虚拟账户 实录
开启用户注册的邮件检验功能,需要发送邮件,使用其他服务商的邮件服务总有每日和发送间隔发送邮件限制.
废话不多说主要实现功能为设置postfix配置,启用smtp服务帐号,只用来发送邮件验证和newsletter邮件
一:配置postfix及简单简介
开始之前,先介绍几个枯燥的名词:
MUA:用户代理端,即用户使用的写信、收信客户端软件。比如:outlook、foxmail等客户端软件,乃至通过浏览器登录邮箱并发送邮件的BS架构网页也算是MUA。
MTA:邮件传送端,即常说的邮件服务器,用于转发、收取用户邮件。本文之中的postfix实现的就是MTA,当然postfix也是一种特殊的MUA,不再深入介绍,本文之中仅把postfix当做MTA使用。
MDA:邮件代理端,相当于MUA和MTA的中间人,可用于过滤垃圾邮件。
POP:邮局协议,当前是第三版,也就是POP3,用于MUA连接服务器收取用户邮件,通信端口110。
IMAP:互联网应用协议,功能与POP类似:也用于MUA连接服务器收取用户邮件;功能较POP多,通信端口143。
SMTP:简单邮件传送协议,MUA连接MTA或MTA连接MTA发送邮件使用此协议,通信端口25,启用ssl/tls的情况下端口为465或587。
一般发邮件的步骤流程是:
1、MUA通过POP、IMAP或SMTP协议连接MTA(称之为mta1);本文之中php通过phpmailer请求发送邮件的php脚本就扮演了MUA的角色,而postfix就是MTA;
2、MUA发送邮件给mta1(或者说MUA通过mta1发送邮件);本文中postfix就是这个mta1;
3、mta1与其他的MTA自主沟通连接将邮件传送至指定域下的指定用户(此时mta1就扮演了MUA的角色功能,这种交互是由邮件系统软件自主实现,与用户端无关)。
本次搭建postfix目的很明确:
› Continue reading
centos7使用killall命令
星期五, 十二月 11th, 2015 | linux | 没有评论
安装完成centos7的最小化安装后,发现没有killall指令
使用yum安装psmisc即可
yum install psmisc
简单介绍一下 psmisc :
Psmisc软件包包含三个帮助管理/proc目录的程序。
安装下列程序: fuser, killall,pstree和pstree.x11(到pstree的链接)
fuser 显示使用指定文件或者文件系统的进程的PID。
killall 杀死某个名字的进程,它向运行指定命令的所有进程发出信号。
pstree 树型显示当前运行的进程。
pstree.x11 与pstree功能相同,只是在退出前需要确认。

Search
相关文章
热门文章
最新文章
文章分类
- ajax (10)
- algorithm-learn (3)
- Android (6)
- as (3)
- computer (86)
- Database (30)
- disucz (4)
- enterprise (1)
- erlang (2)
- flash (5)
- golang (3)
- html5 (18)
- ios (4)
- JAVA-and-J2EE (186)
- linux (144)
- mac (10)
- movie-music (11)
- pagemaker (36)
- php (50)
- spring-boot (2)
- Synology群晖 (2)
- Uncategorized (7)
- unity (1)
- webgame (15)
- wordpress (33)
- work-other (2)
- 低代码 (1)
- 体味生活 (40)
- 前端 (21)
- 大数据 (8)
- 游戏开发 (9)
- 爱上海 (19)
- 读书 (4)
- 软件 (3)