JAVA使用HikariCP开启执行批量执行插入数据
星期五, 2021-04-30 | Author: Lee | JAVA-and-J2EE | 没有评论 1,288 views

1.使用HikariConfig配置如下: 开启批量处理
#mysql config jdbcUrl=jdbc:mysql://localhost:3306/xxx?useUnicode=true&characterEncoding=UTF-8&zeroDateTimeBehavior=convertToNull&useSSL=false&serverTimezone=Asia/Shanghai username=root password=root driverClassName=com.mysql.cj.jdbc.Driver dataSource.cachePrepStmts=true dataSource.prepStmtCacheSize=250 dataSource.prepStmtCacheSqlLimit=2048 dataSource.useServerPrepStmts=true dataSource.useLocalSessionState=true dataSource.rewriteBatchedStatements=true dataSource.cacheResultSetMetadata=true dataSource.statementsPerBatch=5000 #dataSource.cacheServerConfiguration=true #dataSource.elideSetAutoCommits=true dataSource.maintainTimeStats=false dataSource.useCursorFetch=true autoCommit=true maximumPoolSize=10 |
2.使用批量执行语句
String sql ="INSERT INTO MyTable(ColA, ColB, ColC) VALUES (?, ?, ?)"; //ok batch sql ="INSERT INTO MyTable(ColA, ColB, ColC) VALUE (?, ?, ?)"; //no batch only Inserting one record at a time queryRunner.batch(, new Object[][] { {"A1", "B1", "C1"}, {"A2", "B2", "C2"}, {"A3", "B3", "C3"}}); |
小结:因为使用了 VALUE 不是 VALUES而无法批量生效,一直跟踪debug才发现,浪费了半天时间囧.
解决国内下载vscode慢的方法
星期四, 2021-04-22 | Author: Lee | computer, linux | 没有评论 2,541 views
1.更新对应的cdn域名即可 vscode 官网访问地址:https://code.visualstudio.com/
把原来的:
https://az764295.vo.msecnd.net
替换成
https://vscode.cdn.azure.cn
如下:VSCodeUserSetup-x64-1.55.2.exe国内快速下载地址
比如下载地址是:
https://az764295.vo.msecnd.net/stable/3c4e3df9e89829dce27b7b5c24508306b151f30d/code_1.55.2-1618307277_amd64.deb
更换成:
https://vscode.cdn.azure.cn/stable/3c4e3df9e89829dce27b7b5c24508306b151f30d/code_1.55.2-1618307277_amd64.deb
2.体验国内下载飞一般的速度^-^.
解决vi不能使用鼠标右键复制粘贴的问题
星期四, 2021-04-22 | Author: Lee | linux | 没有评论 2,352 views
使用最新版本的deepin 20.2的版本,使用vi编辑文件时,发生无法使用鼠标右键复制和粘贴功能,很是不方便。
一使用粘贴就会进入可视插入的模式,解除此模式也很简单 使用 :set mouse=v 即可
##在可视模式下使用鼠标搞定 :set mouse=v ###启动了所有模式,这样就屏蔽了鼠标右健功能 :set mouse=a |
centos7下yum安装PHP 7.4, 7.3 & 7.2 & 7.1
星期二, 2021-03-09 | Author: Lee | linux, php | 没有评论 1,904 views
centos7下yum安装PHP 7.4, 7.3 & 7.2 & 7.1
1.系统为centos7.9
2.使用yum安装 命令如下:
sudo yum install epel-release sudo rpm -Uvh http://rpms.famillecollet.com/enterprise/remi-release-7.rpm |
2.1:安装php版本
## Install PHP 7.4 yum --enablerepo=remi-php74 install php ## Install PHP 7.3 yum --enablerepo=remi-php73 install php ## Install PHP 7.2 yum --enablerepo=remi-php72 install php ## Install PHP 7.1 yum --enablerepo=remi-php71 install php |
2.2 安装php相关常用扩展(Modules)
### For PHP 7.4 yum --enablerepo=remi-php74 install php-xml php-soap php-xmlrpc php-mbstring php-json php-gd php-mcrypt ### For PHP 7.3 yum --enablerepo=remi-php73 install php-xml php-soap php-xmlrpc php-mbstring php-json php-gd php-mcrypt ### For PHP 7.2 yum --enablerepo=remi-php72 install php-xml php-soap php-xmlrpc php-mbstring php-json php-gd php-mcrypt ### For PHP 7.1 yum --enablerepo=remi-php71 install php-xml php-soap php-xmlrpc php-mbstring php-json php-gd php-mcrypt |
2.3 支持mysql及php-fpm
## For PHP 7.4 yum --enablerepo=remi-php74 install php-fpm mysqlnd ## For PHP 7.3 yum --enablerepo=remi-php73 install php-fpm mysqlnd ## For PHP 7.2 yum --enablerepo=remi-php72 install php-fpm mysqlnd ## For PHP 7.1 yum --enablerepo=remi-php71 install php-fpm mysqlnd |
2.4 查看更多可安装的模块
deepin升级后无法进入图形界面的处理办法
星期四, 2021-01-28 | Author: Lee | computer, linux | 没有评论 2,724 views
一直升级都很正常,今天遭遇无法进入图形界面
解决如下:
ssh连接进入命令行界面:
sudo apt-get install deepin-appstore ##注意移除data数据即可 sudo apt-get remove deepin-appstore-data sudo apt-get install dde sudo reboot |
重启后进入搞定
centos7.x配置安装chrome+chromedriver+selenium
星期四, 2020-12-31 | Author: Lee | JAVA-and-J2EE, linux | 没有评论 9,676 views
1.系统centos7.x
下载chrome
wget https://dl.google.com/linux/direct/google-chrome-stable_current_x86_64.rpm |
2. 安装chrome
yum -y install ./google-chrome-stable_current_x86_64.rpm |
2.1.Installed:
google-chrome-stable.x86_64 0:87.0.4280.88-1
查看chrome版本号
[root@localhost soft]# google-chrome --version Google Chrome 87.0.4280.88 |
3.下载对应的chromedriver(87.0.4280.88)版本要保持一致
wget https://npm.taobao.org/mirrors/chromedriver/87.0.4280.88/chromedriver_linux64.zip #解压chromedriver_linux64.zip unzip chromedriver_linux64.zip mv chromedriver /usr/bin/ |
4. 后续使用selenium等就可以愉快的使用了
5.修复中文方块问题
中文字体问题:下载宋体simsun,或者其他字体
把文件放到
/usr/share/fonts/simsun.ttc ##执行命令 fc-cache -fv |
成功后即可
docker-selenium server的安装及使用
星期二, 2020-12-22 | Author: Lee | JAVA-and-J2EE, linux | 没有评论 2,070 views
1.需要使用selenium进行访问网站获取信息及截图
在服务器上安装对应的selenium比较麻烦,有docker真是方便多了
更多使用代码见:启用远程调用Docker下应用selenium-chrome服务
2.安装docker,如果已经安装可以忽略
此处选用的是chrome,完成后访问地址:http://localhost:4444/wd/hub
顺便安装下docker的openjdk11为以后备用.
$ curl -sSL https://get.daocloud.io/docker | sh $ sudo systemctl start docker $ docker run -d -p 4444:4444 -v /dev/shm:/dev/shm selenium/standalone-chrome:4.0.0-beta-1-prerelease-20201208 //如果遭遇iptables nat 等失败 可以重新启动下docker再运行selenium chrome解决 $ service iptables stop $ service iptables start $ sudo systemctl restart docker $ docker run -d -p 4444:4444 -v /dev/shm:/dev/shm selenium/standalone-chrome:4.0.0-beta-1-prerelease-20201208 //仅仅是备用,无需安装 $ docker pull openjdk:11 |
3.使用selenium即可
<dependency> <groupId>org.seleniumhq.selenium</groupId> <artifactId>selenium-java</artifactId> </dependency> |
页面展示HTML的原代码不解析
星期六, 2020-11-07 | Author: Lee | html5, JAVA-and-J2EE | 没有评论 1,508 views
1.页面需要展示原文本,不需要解析,但是碰到有 html标签的部分需要注意
2.使用如下几种方式
2.1 使用 xmp标签 现在在html5中已经废弃,不建议再使用但是也最简单,无需转化
<xmp> 这里的代码将原样输出: <script>这里是脚本</script> </xmp> |
2.2 使用 code 标签或者 pre标签,需要替换尖括号对应的转义符
如下转义即可
var info= "<script>这里是脚本</script>";
//替换一个
info = info.replace('<', '<').replace('>', '>');
//全局替换 //g是重点,如果替换的为‘/’,需要转义,吧/</g替换为'/\//g'
info = info.replace(/</g, '<').replace(/>/g, '>'); |
<code> 这里的代码将原样输出: <script>这里是脚本</script> </code> <--pre> 这里的代码将原样输出: <script>这里是脚本</script> <--/pre> |
2.3 使用 textarea标签
<textarea> 这里的代码将原样输出: <script>这里是脚本</script> </textarea> |
Lombok注解的类在eclipse下寻找getter/setter调用的办法
星期一, 2020-11-02 | Author: Lee | JAVA-and-J2EE | 没有评论 3,177 views
现在用Lombok已经是很普遍了,这里不去争好不好用,只解决个人遇到的不方便之处.
stackoverflow上对应的解决方法原文地址:
https://stackoverflow.com/questions/42644923/eclipse-with-lombok-search-for-getter-and-setter-usages
1.在面板处开启 outline 的选项,可以看到对应的 get和set方法,已经支持 @Setter 和@Getter 、@Data注解
2.右键 选择 “Open Call Hierarchy” 即可看到调用的情况
3.图示如下:
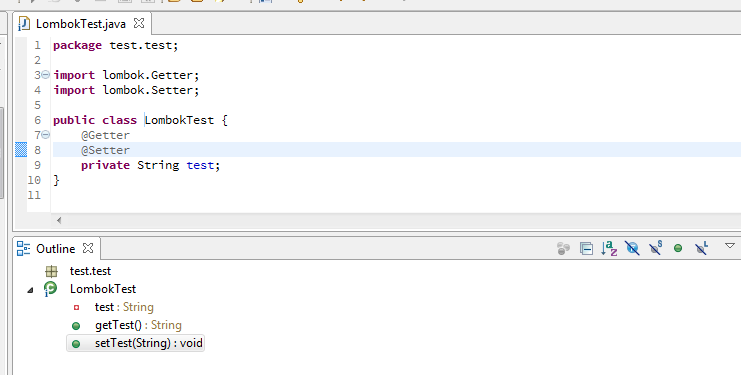
Right-click on the method in the Outline view, and use “Open Call Hierarchy”.
An other way to do it is to right-click on the annotation (@Setter for instance), and use “Open Call Hierarchy” on it
Map不同实现对null值的限制不同
星期五, 2020-10-23 | Author: Lee | JAVA-and-J2EE | 没有评论 2,190 views
Map不同实现对null值的限制不同,罗列如下:
| 类 | key | value | 线程安全 |
|---|---|---|---|
| HashTable | 不可为null | 不可为null | 线程安全 |
| ConcurrentHashMap | 不可为null | 不可为null | 线程安全 |
| TreeMap | 不可为null | 可为null | 线程不安全 |
| HashMap | 可为null | 可为null | 线程不安全 |
HashTable由于实现上使用key的hashcode()方法,所以key不能为null。ConcurrentHashMap需要使用key的hashcode(),TreeMap使用key的compare()方法排序,所以key不能为null。

Search
相关文章
热门文章
最新文章
文章分类
- ajax (10)
- algorithm-learn (3)
- Android (6)
- as (3)
- computer (86)
- Database (30)
- disucz (4)
- enterprise (1)
- erlang (2)
- flash (5)
- golang (3)
- html5 (18)
- ios (4)
- JAVA-and-J2EE (186)
- linux (144)
- mac (10)
- movie-music (11)
- pagemaker (36)
- php (50)
- spring-boot (2)
- Synology群晖 (2)
- Uncategorized (6)
- unity (1)
- webgame (15)
- wordpress (33)
- work-other (2)
- 低代码 (1)
- 体味生活 (40)
- 前端 (21)
- 大数据 (8)
- 游戏开发 (9)
- 爱上海 (19)
- 读书 (4)
- 软件 (3)