centos7开启sshd多端口登录及修改端口
星期三, 2019-12-04 | Author: Lee | Database, linux | 3 Comments 2,896 views

0.不知道怎么回事 一台国外的机器的ssh的22端口,时常无法ssh连接,因此多加个端口来备用
1.编辑配置文件打开Port=22 或者修改此端口
vi /etc/ssh/sshd_config
Port 22
Port 1022
2.重启sshd服务
systemctl restart sshd
3.查看服务启动情况
netstat -lntp |
4.防火墙放行
iptables -A INPUT -p tcp --dport 1022 -j ACCEPT |
5.使用xshell等连接即可
可以同时使用22及1022的端口进行sshd连接服务器了
Spring Boot 的核心注解SpringBootApplication引起的探究
星期二, 2019-12-03 | Author: Lee | JAVA-and-J2EE, spring-boot | 没有评论 1,542 views
Spring Boot 的核心注解SpringBootApplication引起的探究
1.Spring Boot 的核心注解是哪个?
先上一个工程的启动配置项看下:
项目比较老混杂了spring boot,dubbo,jersey注册等
package com.pomelolee.cms; import com.ctrip.framework.apollo.spring.annotation.EnableApolloConfig; import com.pomelolee.boot.dubbo.annotation.EnableDubboProvider; import org.glassfish.jersey.server.ResourceConfig; import org.glassfish.jersey.servlet.ServletProperties; import org.springframework.beans.factory.config.BeanDefinition; import org.springframework.boot.SpringApplication; import org.springframework.boot.autoconfigure.SpringBootApplication; import org.springframework.boot.builder.SpringApplicationBuilder; import org.springframework.boot.web.support.SpringBootServletInitializer; import org.springframework.cloud.client.discovery.EnableDiscoveryClient; import org.springframework.cloud.netflix.feign.EnableFeignClients; import org.springframework.context.annotation.Bean; import org.springframework.context.annotation.ClassPathScanningCandidateComponentProvider; import org.springframework.context.annotation.ImportResource; import org.springframework.util.ClassUtils; import java.util.HashSet; import java.util.Set; @EnableFeignClients @SpringBootApplication @EnableApolloConfig @EnableDiscoveryClient @EnableDubboProvider @ImportResource("classpath*:/META-INF/spring/spring-job.xml") public class Application extends SpringBootServletInitializer { public static void main(String[] args) { SpringApplication.run(Application.class, args); } @Override protected SpringApplicationBuilder configure(SpringApplicationBuilder application) { return application.sources(Application.class); } @Bean public ResourceConfig resourceConfig() { ResourceConfig resourceConfig = new ResourceConfig(); ClassPathScanningCandidateComponentProvider scanner = new ClassPathScanningCandidateComponentProvider(true); Set<beandefinition> beanDefinitionSet = scanner.findCandidateComponents("com.pomelolee.cms.service"); beanDefinitionSet.addAll(scanner.findCandidateComponents("com.pomelolee.cms.facade")); beanDefinitionSet.addAll(scanner.findCandidateComponents("com.pomelolee.cms.config")); Set<Class<?>> clazzSet = new HashSet<Class<?>>(); for (BeanDefinition beanDefinition : beanDefinitionSet) { clazzSet.add( ClassUtils.resolveClassName( beanDefinition.getBeanClassName(), resourceConfig.getClassLoader())); } resourceConfig.registerClasses(clazzSet); resourceConfig.property(ServletProperties.FILTER_FORWARD_ON_404, true); return resourceConfig; } } </beandefinition> |
@SpringBootApplication 注解,就是 Spring Boot 的核心注解。
centos下jdk11及jdk8的环境变量配置
星期三, 2019-11-20 | Author: Lee | JAVA-and-J2EE, linux | 一条评论 3,859 views
0.最新的下载地址
Oracle 官方下载地址:https://www.oracle.com/technetwork/java/javase/downloads/index.html
国内镜像仓库华为:https://repo.huaweicloud.com/java/jdk/
由于Oracle JDK 11 的许可证的变化,生产环境需要使用OpenJDK 11(以免甲骨文律师信警告^o^)
亚马逊的编译版本下载地址(corretto):https://aws.amazon.com/cn/corretto/
adoptopenjdk编译的版本下载:https://adoptopenjdk.net/
1.配置jdk11、jdk12的 /etc/profile文件最后面追加即可,
jdk9后续版本将不再有jre及classpath要配置了
vi /etc/profile export JAVA_HOME=/usr/local/webserver/jdk/jdk-11.0.5 export PATH=$PATH:$JAVA_HOME/bin |
后续source 生效
source /etc/profile java -version |
2.配置jdk8的配置文件
tar zxvf jdk-8u231-linux-x64.tar.gz mv jdk1.8.0_231 /usr/local/java/ vi /etc/profile export JAVA_HOME=/usr/local/java/jdk1.8.0_231 export JRE_HOME=/usr/local/java/jdk1.8.0_231/jre export CLASSPATH=.:$CLASSPATH:$JAVA_HOME/lib:$JRE_HOME/lib export PATH=$PATH:$JAVA_HOME/bin:$JRE_HOME/bin |
golang开发环境快速搭建centos版本
星期二, 2019-11-12 | Author: Lee | golang | 没有评论 1,681 views
1.用golang写过一些工具,每次要开发工具的时候还要去弄下对应的环境,记录下,好随时翻阅
这里使用的是centos8,window版本直接配置即可
2.官网下载二进制安装包,现在有国内可以访问的地址了
wget https://dl.google.com/go/go1.13.4.linux-amd64.tar.gz mkdir -p /usr/local/golang/opt/ tar -C /usr/local/golang/opt/ -zxvf go1.13.4.linux-amd64.tar.gz mkdir -p /usr/local/golang/repos/gopath/ |
3.设置环境变量填写如下地址
vi /etc/profile export GOROOT=/usr/local/golang/opt/go export GOPATH=/usr/local/golang/repos/gopath export PATH=$PATH:$GOROOT/bin source /etc/profile go version |
4.编写hello.go文件测试
cd /usr/local/golang/repos/gopath vi hello.go package main import "fmt" func main(){ fmt.Printf("hello,world\n"); } |
5.运行及编译
go run hello.go go build hello.go ./hello |
6.解决不翻墙go get之类的net包问题
mkdir -p $GOPATH/src/golang.org/x/ cd $GOPATH/src/golang.org/x/ yum install git git clone https://github.com/golang/net.git net go install net |
执行go install之后没有提示,就说明安装好了。
7.后续就各种api 开发吧
https://golang.google.cn/doc/
centos8的最小化安装及更换yum地址
星期二, 2019-11-12 | Author: Lee | linux | 没有评论 3,744 views
1.centos8的下载地址
http://isoredirect.centos.org/centos/8/isos/x86_64/
选择CentOS-8-x86_64-1905-boot.iso下载这个比较小只有500M多点
DVD版本太大了6.6G的样子,想安装省事可以直接下载这个CentOS-8-x86_64-1905-dvd1.iso 版本
2.这里选择是阿里云的下载地址
centos8用于网络安装的镜像文件 https://mirrors.aliyun.com/centos/8/isos/x86_64/CentOS-8-x86_64-1905-boot.iso 534M
完整安装包要 6.64G https://mirrors.aliyun.com/centos/8/isos/x86_64/CentOS-8-x86_64-1905-dvd1.iso
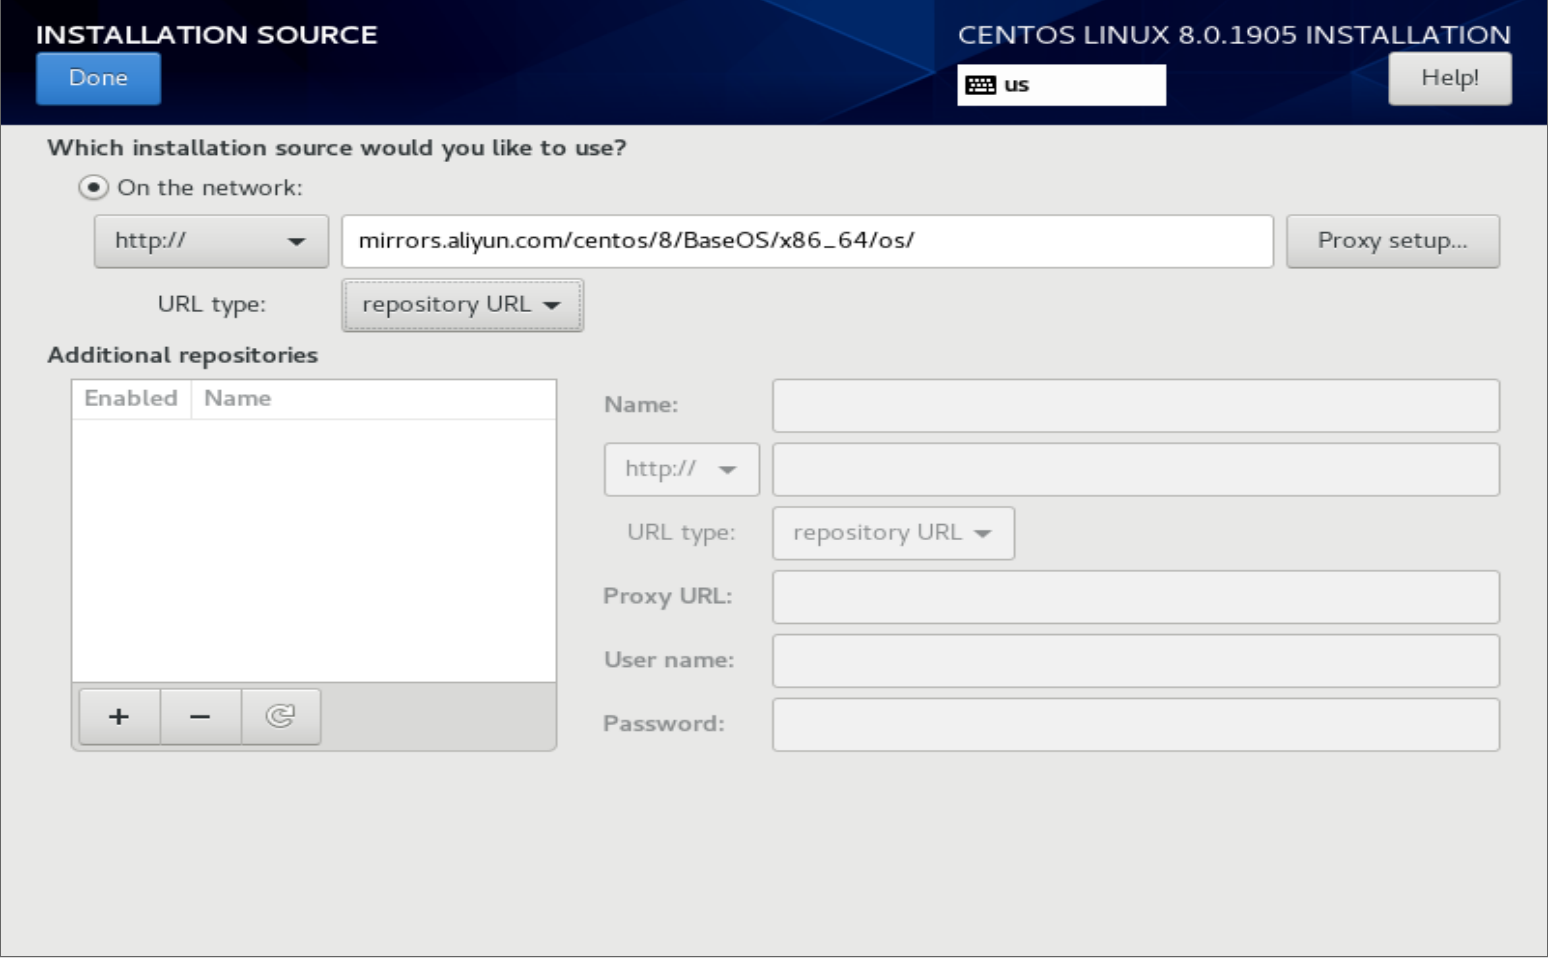
3.安装界面先配置下网络点选下即可,主要是配置安装源 如下图配置即可
网络地址填写下面即可:http://mirrors.aliyun.com/centos/8/BaseOS/x86_64/os/
4.后续安装就等待即可,设置下root和账号密码等
5.更新yum源头及安装下网络工具
yum install net-tools |
可以使用 netstat -lntp工具了
cd /etc/yum.repos.d vi CentOS-Base.repo ## 修改为如下内容 CentOS-Base.repo [BaseOS] name=CentOS-$releasever - Base #mirrorlist=http://mirrorlist.centos.org/?release=$releasever&arch=$basearch&repo=BaseOS&infra=$infra #baseurl=http://mirror.centos.org/$contentdir/$releasever/BaseOS/$basearch/os/ baseurl=https://mirrors.aliyun.com/centos/$releasever/BaseOS/$basearch/os/ gpgcheck=1 enabled=1 gpgkey=file:///etc/pki/rpm-gpg/RPM-GPG-KEY-centosofficial vi CentOS-AppStream.repo ## CentOS-AppStream.repo [AppStream] name=CentOS-$releasever - AppStream #mirrorlist=http://mirrorlist.centos.org/?release=$releasever&arch=$basearch&repo=AppStream&infra=$infra #baseurl=http://mirror.centos.org/$contentdir/$releasever/AppStream/$basearch/os/ baseurl=https://mirrors.aliyun.com/centos/$releasever/AppStream/$basearch/os/ gpgcheck=1 enabled=1 gpgkey=file:///etc/pki/rpm-gpg/RPM-GPG-KEY-centosofficial yum makecache |
使用shell脚本批量发送curl的POST数据请求
星期五, 2019-10-18 | Author: Lee | JAVA-and-J2EE, linux | 没有评论 7,934 views
里面写了sleep睡眠,可以移除
写定循环传递参数等,用于自动处理数据比较方便,记录如下,可以根据自己的情况进行调整.
shell脚本如下
#!/bin/bash function curlRequest() { echo ">>>>>>>>>>>>>>"$1 info=`curl -s -H "Accept: application/json" -H "Content-type: application/json" -X POST -d "{\"id\":$1,\"processState\":3}" "https://www.pomelolee.com/info" ` echo "<<<<<<<<<<<<<<"$info #info=`curl -s -m 10 --connect-timeout 10 -I $1` #code=`echo $info|grep "HTTP"|awk '{print $2}'` #if [ "$code" == "200" ];then # echo "request succeed,ret code is $code" #else # echo "request fail,ret code is $code" #fi } ids=(29 100 13 8 91 44) for id in ${ids[@]} do curlRequest $id echo $id sleep 2s done |
vertx初体验之使用vertx3.8.2压缩运行内存及发布包大小
星期四, 2019-10-17 | Author: Lee | JAVA-and-J2EE | 没有评论 4,142 views
当前vertx版本3.8.2
0.起因,做了一个简单的数据监控收集,要求嘛 当然是快速返回,异步处理收集的数据
用spring boot 是很快做了出来,打包后35M,部署到机器上运行内存占用175M,实际上也不多,奈何我的机器才1C1G,又装了mysql等
1.使用vertx实现功能,降低内存运行时(60M),发布包大小7M
2.可以到 https://start.vertx.io/ 自动创建一个应用很方便
更多官方的示例见 vertx-examples
3.直接main启动应用
public class MainLauncher extends Launcher { public static void main(String[] args) { new MainLauncher().dispatch(new String[] { "run", MainVerticle.class.getName() }); // startVertx(); } public static void startVertx() { try { Vertx.vertx() .deployVerticle(new MainVerticle(), new DeploymentOptions().setConfig(new JsonObject(new String(Files.readAllBytes(Paths.get( "conf/conf.json")))))); } catch (Exception e) { e.printStackTrace(); } } } |
4.主程序如下
@Override public void start(Promise<Void> startPromise) throws Exception { JsonObject jo = config(); Router router = Router.router(vertx); router.get("/").handler(this::indexHandler); vertx.createHttpServer().requestHandler(router).listen(jo.getInteger("http.port", 8080), http -> { if (http.succeeded()) { startPromise.complete(); } else { startPromise.fail(http.cause()); } }); //aiService = new AiServiceImpl(vertx, jo); //aiService.loadDataCache(); } private void indexHandler(RoutingContext context) { context.response().putHeader("Content-Type", "text/html"); context.response().end("Hello vip."); } |
5.打包完成后启动脚本
java -jar AI-1.0.0-fat.jar -conf /config/AI/conf.json & |
centos7下的php-fpm的优化
星期四, 2019-10-03 | Author: Lee | linux, php | 没有评论 2,424 views
云主机只有1C1G的内存,既要运行wordpress还要运行一个java程序及mysql,内存实在吃紧,运行1天发现mysql内存不足被杀掉,随优化之。
1.优化mysql参数
[myisamchk]
key_buffer_size = 8M
sort_buffer_size = 8M
read_buffer = 4M
write_buffer = 4M
详情可以参考 https://www.pomelolee.com/1304.html
2.php-fpm优化,减少php-fpm的数量
配置文件地址:/etc/opt/remi/php70/php-fpm.conf
实际修改配置文件:/etc/opt/remi/php70/php-fpm.d/www.conf
systemctl stop php70-php-fpm.service
pm = dynamic
pm.start_servers = 2
pm.min_spare_servers = 2
pm.max_spare_servers = 5
systemctl restart php70-php-fpm.service
Synology群晖查询机器的外网IP
星期四, 2019-09-26 | Author: Lee | Synology群晖 | 一条评论 14,603 views
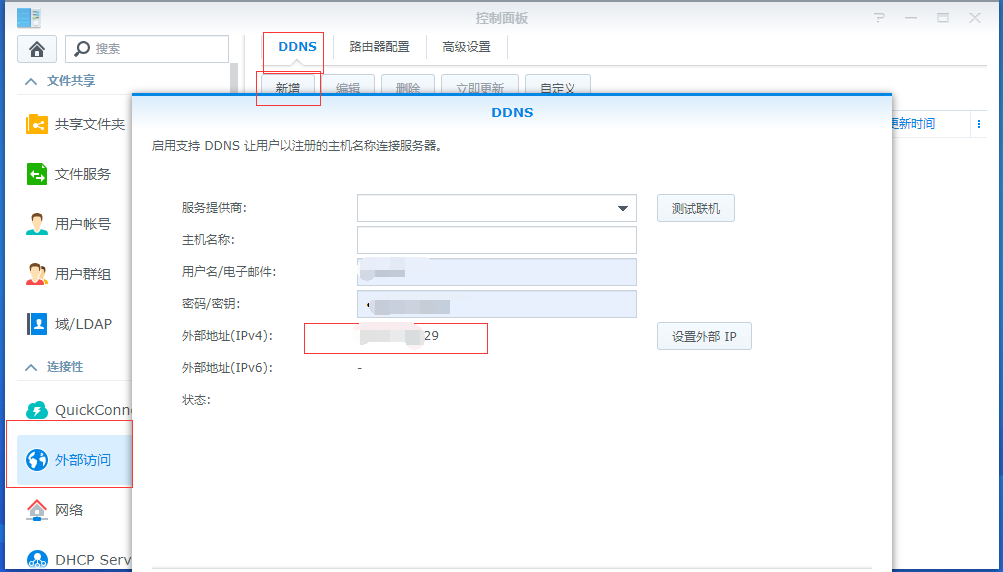
1.起因家里的网络IP经常更换,可以通过群晖的后台直接查看,如图
2.登录群晖的后台,可以在后台直接查看到此时的外网ip
外部访问–》DDNS–》外部地址(IPv4)新建里可以查看
让PHP7兼容老版本的php5.5.x或者5.6下的mysql_connect的处理代码
星期一, 2019-09-09 | Author: Lee | linux, php | 没有评论 3,566 views
1.昨天折腾了下服务器,把系统从centos6.5更新到7.6,也把对应的php版本升级到了php7.0.x系列
2.好多年没有再怎么写php代码了,以前写的也是在php5.5.x的版本写的,升级后发现程序无法使用,郁闷ing
3.跟踪下 /var/opt/remi/php70/log/php-fpm 下的 www-error.log发现是 php7已经不支持mysql_connect
4.网上找了下兼容的代码新增了 mysql_num_rows的函数的处理,我以前的老代码又可以欢快的跑起来了,记录下,也方便需要的朋友
$dbhost = DATA_HOST; $dbport = 3306; $dbuser = DATA_USERNAME; $dbpass = DATA_PASSWORD; $dbname = DATA_NAME; if(!function_exists('mysql_connect')){ function mysql_connect($dbhost, $dbuser, $dbpass){ global $dbport; global $dbname; global $mysqli; $mysqli = mysqli_connect("$dbhost:$dbport", $dbuser, $dbpass, $dbname); return $mysqli; } function mysql_select_db($dbname){ global $mysqli; return mysqli_select_db($mysqli,$dbname); } function mysql_fetch_array($result){ return mysqli_fetch_array($result); } function mysql_fetch_assoc($result){ return mysqli_fetch_assoc($result); } function mysql_fetch_row($result){ return mysqli_fetch_row($result); } function mysql_query($query){ global $mysqli; return mysqli_query($mysqli,$query); } function mysql_escape_string($data){ global $mysqli; return mysqli_real_escape_string($mysqli, $data); } function mysql_real_escape_string($data){ return mysql_real_escape_string($data); } function mysql_close(){ global $mysqli; return mysqli_close($mysqli); } function mysql_num_rows($result){ return mysqli_num_rows($result); } } |

Search
相关文章
热门文章
最新文章
文章分类
- ajax (10)
- algorithm-learn (3)
- Android (6)
- as (3)
- computer (86)
- Database (30)
- disucz (4)
- enterprise (1)
- erlang (2)
- flash (5)
- golang (3)
- html5 (18)
- ios (4)
- JAVA-and-J2EE (186)
- linux (144)
- mac (10)
- movie-music (11)
- pagemaker (36)
- php (50)
- spring-boot (2)
- Synology群晖 (2)
- Uncategorized (7)
- unity (1)
- webgame (15)
- wordpress (33)
- work-other (2)
- 低代码 (1)
- 体味生活 (40)
- 前端 (21)
- 大数据 (8)
- 游戏开发 (9)
- 爱上海 (19)
- 读书 (4)
- 软件 (3)